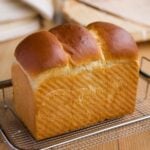
Soft & Fluffy Sourdough Milk Bread
This Sourdough Milk Bread is irresistibly soft & fluffy. It’s made with a sweet stiff starter (instead of yeast), which reduces tang, improves texture, and builds richer, more complex flavors. Perfect for Korean Street Toast!
Servings: 1 loaf
Ingredients
Sweet Stiff Starter
- 15 g ripe starter
- 15 g sugar
- 80 g strong all-purpose flour or bread flour
- 40 g warm water
Tangzhong (roux)
- 25 g strong all-purpose flour or bread flour
- 120 g milk
Final Dough
- all of the sweet stiff starter
- all of the tangzhong
- 300 g strong all-purpose flour or bread flour
- 125 g milk 2% or whole, room temperature
- 30 g softened butter
- 30 g sugar
- 1 tsp kosher salt Diamond Crystal
- 1 egg room temperature
- 10 g milk powder optional
Instructions
Make the sweet stiff starter
- Combine 15 g ripe starter, 80 g flour, 15 g sugar, and 40 g warm water in a small bowl. Knead for 2–3 minutes until fully mixed.
- Cover and ferment until it peaks, around 6 hours. The starter is ready to use when domed, airy, and has at least doubled in size. *Keep the starter warm – Maintain the sweet stiff starter at 78–85°F (26–29°C) to encourage yeast activity and keep acidity low.
Make the tangzhong
- In a small saucepan over medium-low heat, whisk together 120 g milk and 25 g flour until it thickens into a smooth, custard-like paste. Set aside to cool slightly.
Combine ingredients for final dough:
- In a stand mixer bowl fitted with the dough hook, combine: flour, sweet stiff starter, tangzhong, egg, sugar, softened butter, salt, milk, and optional milk powder. *Pro tip: If your milk or egg are still a bit cold, you can use the tangzhong while it’s still warm to help bring the dough to a warmer temperature for fermentation. Just make sure it’s not piping hot, or it could affect the starter.
- Mix on low (“stir”) speed for 1–2 minutes until just combined. Scrape down the sides.
- Increase to speed 4 (medium) for 4 minutes to help develop gluten.
- Reduce to speed 2 and knead for 6–8 minutes, or until the dough forms a smooth ball on the hook and pulls away from the sides of the bowl.
- Turn the dough onto a lightly wet surface. Perform a few slap-and-folds and shape into a smooth, taut ball.
- Place the dough in a lightly greased bowl and cover. Ferment until doubled in size, typically 3½–6 hours depending on starter strength and environment. Refer to my temperature & timing chart for guidance.Moderate environment (75–78 °F / 24–26 °C): allows steady, controlled fermentation.Advanced option: If you’re confident reading your dough, warmer conditions (up to ~83 °F / 28 °C) will work. This is how I do it, usually taking 3½–4 hours. Just watch closely to avoid overproofing.
Divide & pre shape
- Turn the dough onto a lightly floured surface and divide into 2 or 3 equal pieces.
- Preshape each piece into a ball, cover, and rest for 20–30 minutes.
Final shape
- Lightly flour your work surface and the tops of the dough balls. Roll each piece to about ⅓ inch thick, then fold the top and bottom edges toward the center to form a rectangle. Gently flatten to about ½ inch, then roll into a log and pinch the seam to seal (see photo collage above for reference)
- Place each piece in a well-greased 1‑lb Pullman loaf pan, rolling or tucking edges to fit neatly.
Final proof
- Cover and proof in a warm spot until the dough nearly reaches the top of the pan. Refer to my temperature & timing chart for guidance.
Bake
- Preheat the oven to 350 °F (175 °C) about 15 minutes before baking.
- Lightly brush the tops of the dough with milk, being careful not to let it drip down the sides, as the sugars can cause the loaf to stick to the pan.
- Bake for 28-30 minutes, until the crust is golden brown.
Rest and remove
- Let the bread cool in the pan for 10 minutes so the sides set and release easily. Remove the loaves and cool completely on a wire rack.Tip: If you’re having trouble removing the loaves cleanly, use a silicone bench scraper to gently loosen the sides so they release more easily.
Notes
I use Costco organic all-purpose flour (11.5% protein), which is slightly stronger than most AP flours. For best results, you can substitute bread flour, or use a higher-protein all-purpose flour. Lower-protein AP will still work, but the dough may be softer and slightly less structured.
Temperature matters – Keep the sweet stiff starter warm (78–85 °F / 26–29 °C) to encourage yeast activity and keep acidity low. For the final dough, moderate temperatures (75–78 °F / 24–26 °C) allow steady, controlled fermentation and a soft, pillowy crumb. Advanced bakers can proof in slightly warmer conditions (up to ~83 °F / 28 °C) if they monitor the dough closely to avoid overproofing.
Dough will be soft and slightly sticky – Resist adding too much extra flour. It will become smoother as gluten develops. Lightly wetting your hands can help with handling.
Mixing generates heat – Keep in mind that stand mixers can warm the dough. make adjustments accordingly.
Proofing takes time – Enriched doughs rise more slowly due to butter, milk, and sugar. Be patient and rely on visual cues rather than strict timing.
Cool before slicing – Let the bread cool completely to set the crumb and avoid a gummy texture.
Adjust your starter to your schedule – This recipe takes about 12 hours from start to finish when fermenting at warmer temperatures. To make it more flexible, you can refrigerate your sweet stiff starter at about 75% rise overnight, then bring it back to room temperature the next day and let it fully peak before using. I’ve done this with great results.
Nutrition
Serving: 1loaf | Calories: 2136kcal | Carbohydrates: 372g | Protein: 59g | Fat: 43g | Saturated Fat: 24g | Polyunsaturated Fat: 4g | Monounsaturated Fat: 11g | Trans Fat: 1g | Cholesterol: 267mg | Sodium: 2722mg | Potassium: 1003mg | Fiber: 11g | Sugar: 62g | Vitamin A: 1478IU | Vitamin C: 1mg | Calcium: 488mg | Iron: 20mg
